Collaborate on documents in really real-time on SUSE Linux
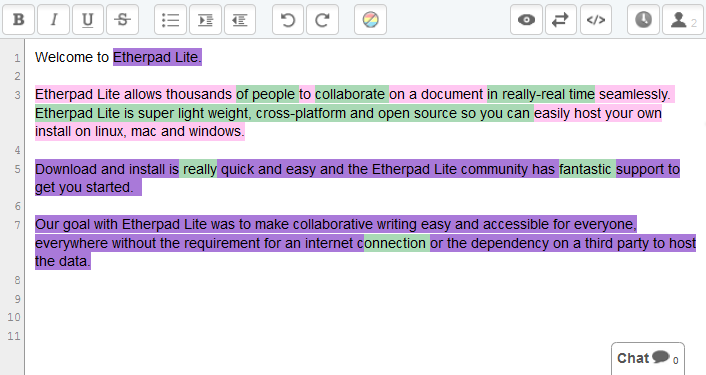
EtherPad is the first web-based word processor that allows people to work together in really real-time.
All editing of the document is instantly visible on the screens of all participating users, enabling new and productive ways to collaborate on text documents. Etherpad is useful for meeting notes, drafting sessions, education, team programming, and more…
1. Online word-processor with formatting options
2. Letter by letter collaboration
3. Color-coded edits
4. Infinite Undo
5. History Playback
6. Import HTML, Word, RTF
7. Export as HTML, Word, PDF
8. Change Zoom
9. Super simple to embed into your own website/CMS with jQuery and PHP examples
10. Support with PHP, jQuery, Elgg, Apple devices, JavaScript, Ruby, Python etc.
Instructions for compiling and running the EtherPad open source release
How we can install Etherpad on Open SUSE Linux?
I just want to help you out… If you want to pay me nothing that is fine too! 😉
Here are some simple steps to install Etherpad on Open SUSE Linux…..
SUSE Linux is different from RedHat, CentOS or Ubuntu. General Package Managers / Setup Tool won’t work on SUSE, It support Zypper or YaST.
First check your server architecture
# uname -a
http://www.cyberciti.biz/faq/linux-how-to-find-if-processor-is-64-bit-or-not/
# cd /usr/local
Requirements
Java 1.6 (tested with 1.6.0_20)
Scala 2.7 (tested with 2.7.7)
MySQL Server 5.1 (tested with 5.1.59)
mysql-connector-java (tested with 5.1.18)
Create username ‘etherpad’ with password ‘password’
# useradd -r -m etherpad
# passwd etherpad
Install Java
# uname -a
I am using 32-bit here…
# wget http://autosetup1.googlecode.com/files/jdk-6u20-linux-i586-rpm.bin
# sh jdk-6u20-linux-i586-rpm.bin
# java -version
Install fastjar
# zypper install fastjar
or
# yast –install fastjar
or
# yast2 –install fastjar
Download Scala
# wget http://www.scala-lang.org/sites/default/files/linuxsoft_archives/downloads/distrib/files/scala-2.7.7.final.tgz
# tar xvzf scala-2.7.7.final.tgz
Install MySQL
http://dev.mysql.com/downloads/mysql/5.1.html#downloads
# zypper install mysql-server
# service mysqld start
# chkconfig mysqld on
Download MySQL Java Connector
Try
# zypper install mysql-connector-java
Or
# wget http://mysql.llarian.net/Downloads/Connector-J/mysql-connector-java-5.1.18.tar.gz
# tar xvzf mysql-connector-java-5.1.18.tar.gz
Install MERCURIAL .. OR GIT
# zypper install mercurial
# zypper install git
Make sure port 9000 must be open on IPTABLES / Firewall
# /etc/sysconfig/iptables
-A RH-Firewall-1-INPUT -p tcp -m state –state NEW -m tcp –dport 9000 -j ACCEPT
Environment
Various scripts make assumptions about environment variables:
JAVA should be set to the java executable.
JAVA_HOME should be set to the main jdk directory.
SCALA should be set to the scala executable.
SCALA_HOME should be set to the main scala distribution directory.
PATH should contain $JAVA, $SCALA, and mysql
MYSQL_CONNECTOR_JAR should be set to the mysql-connector JAR file included in the mysql-connector download.
For example, this sets up the environment on my machine:
# touch myENV
# vi myENV
export JAVA_HOME=/usr/java/jdk1.6.0_20/
export JAVA=$JAVA_HOME/bin/java
export SCALA_HOME=/usr/local/scala/scala-2.7.7.final/
export SCALA=$SCALA_HOME/bin/scala
export PATH=$JAVA_HOME/bin:$SCALA_HOME/bin:$PATH
export MYSQL_CONNECTOR_JAR=/usr/local/mysqlconnector/mysql-connector-java-5.1.18-bin.jar
# cat myENV >> /etc/profile
Download EtherPad
# hg clone https://etherpad.googlecode.com/hg/ etherpad
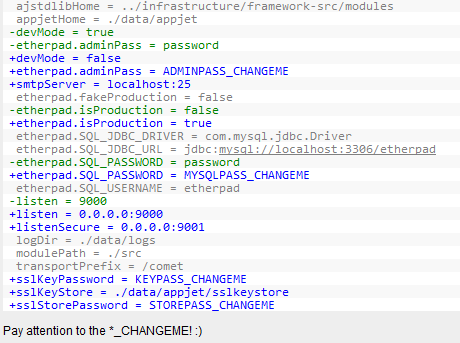
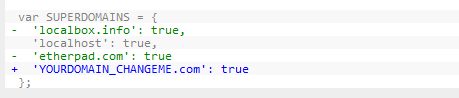
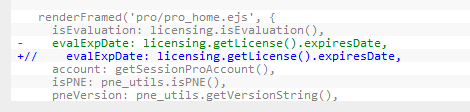
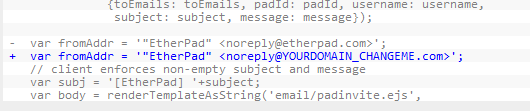
Some Changes in etherpad source for your server…
./etc/etherpad.localdev-default.properties
# cd /usr/local
# cd etherpad/trunk/etherpad
# cp etc/etherpad.localdev-default.properties data/etherpad.local.properties
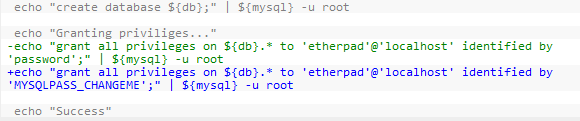
./bin/setup-mysql-db.sh
./src/main.js

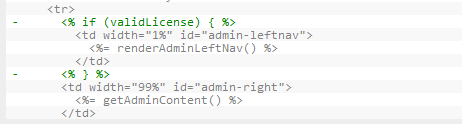
./src/templates/pro/admin/admin-template.ejs
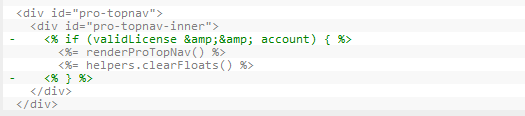
./src/templates/framed/framedheader-pro.ejs
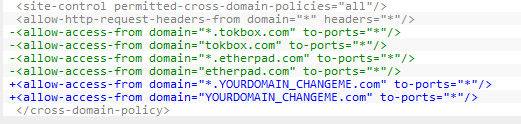
./src/static/crossdomain.xml
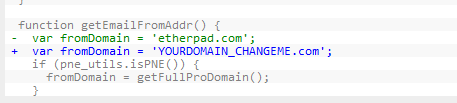
./src/etherpad/pro/pro_utils.js
./src/etherpad/globals.js
./src/etherpad/control/pro/pro_main_control.js
./src/etherpad/control/pad/pad_control.js
./src/etherpad/control/global_pro_account_control.js

Database Setup
The scripts assume mysqld is running on localhost. Once mysqld is running, you can set up the etherpad database by running the following command inside ajcode/etherpad/.
# bin/setup-mysql-db.sh
This will create a database called “etherpad” with the password “password”, and grant privileges to the user “etherpad”.
All the tables will be set up the first time etherpad is run.
Compiling
EtherPad compiles all its Java and Scala libraries into a single JAR. To build this jar, you can run the following command inside ajcode/etherpad/.
# bin/rebuildjar.sh
If you modify anything in ajcode/infrastructure, you will most likely need to kill the server, rebuild the jar, and re-launch the server before your change takes effect.
Code inside ajcode/etherpad/src can be modified while the server is running, and the changes will automatically get picked up.
Running
To run the etherpad web server, execute the following command inside ajcode/etherpad/.
# bin/run-local.sh
The first time you run this, it should print out lots of messages about database migrations and finally print:
HTTP server listening on http://youdomain:9000/
At this point, you should be able to visit http://youdomain:9000/ in your web browser and create a new pad.
Thanks to Pauleira!
If you have error related to JVM
Error occurred during initialization of VM
Could not reserve enough space for object heap
Could not create the Java virtual machine.
Fix using
# export _JAVA_OPTIONS=’-Xms32m -Xmx56m -Xss128k -XX:PermSize=32m -XX:MaxPermSize=64m’
Other Link:
http://code.google.com/p/etherpad/
http://etherpad.com/
https://github.com/ether/pad
http://etherpad.org/

